Amazon Web Services continually improve and provide new services, with the AWS Transit Gateway service being introduced in November 2018 to allow customers to have a single gateway to connect multiple VPCs together. The benefits of using Transit Gateways are reduced administrative overhead and ease of troubleshooting, leading to improvements in the ability to scale and monitor the networks being managed.
AWS documentation states that the Transit Gateway “is a service that enables customers to connect their Amazon Virtual Private Clouds (VPCs) and their on-premise networks to a single gateway”, but did you know that it can also be used to setup a single AWS account in your organisation as your egress point for all Internet traffic? Read on for a guide on how to set this up.
Following the Hub-and-Spoke Network Design, you would be running multiple AWS accounts setup in an AWS Organisation. The use of a Transit Gateway as the hub in a dedicated account will make routing and troubleshooting easier between these accounts. However, it is stated that there will be additional data transfer costs for traffic traversing the transit VPC account, specifically from any spoke account via the transit gateway to another spoke account/on-premise network. Also bear in mind that Transit Gateways cannot be shared across regions.
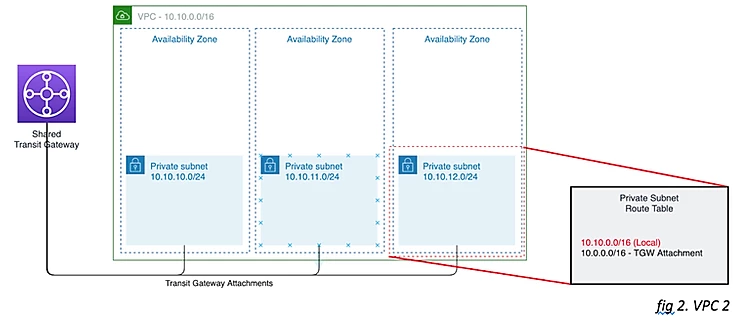
The first step in your Transit Account is to deploy a VPC with Public and Private Subnets, Route Tables, Internet Gateways and NAT Gateways. Once complete, create a Transit Gateway and a Transit Gateway Attachment and include the required private subnets in the attachment. Best practise is to include a private subnet from each availability zone.

Next, if the Transit Gateway is to be shared across accounts, go to the AWS Resource Access Manager console and share the Transit Gateway with those account IDs which need to have access. Access the accounts to which it has been saved, accept the share and create a Transit Gateway attachment to the private subnets in the VPC in that account.
If the Transit Gateway is to be shared with multiple VPCs in the same account, create additional Transit Gateway attachments to those VPCs private subnets.
In the account which hosts the Transit Gateway, create a Transit Gateway Route Table for each attachment and associate the attachment with that route table. This will allow fine-grained control over the routing in the environment.
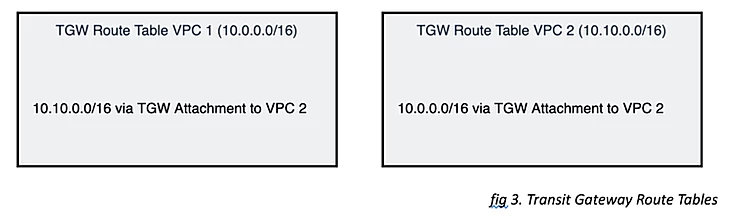
For this setup, without Internet access being configured for the second VPC, the following Transit Gateway Route Tables and entries exist in fig. 3.
This will allow traffic to flow between all subnets in both accounts, with Internet access only in VPC 1 as the subnet routing tables use the Internet and NAT Gateways in that VPC. Now to enable sharing of the NAT gateways for VPC 2 to have Internet access.
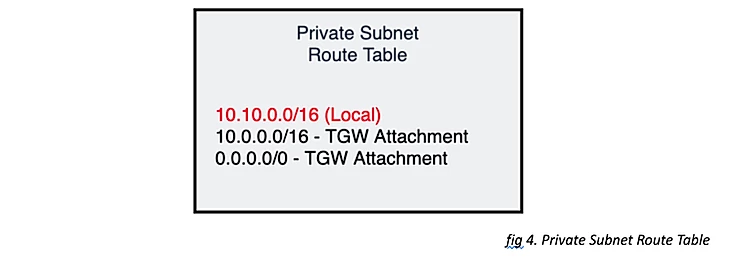
First, update the Private Subnet Route Tables in VPC 2 to have a destination CIDR of ‘0.0.0.0/0’ pointing to the Transit Gateway, see fig 4.
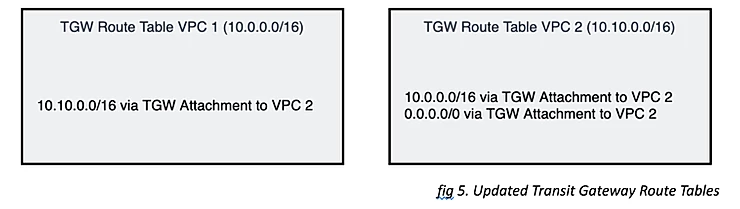
Finally, update the Transit Gateway Route Table for VPC 2 to forward all traffic for ‘0.0.0.0/0’ via the VPC 1 Transit Gateway, see fig 5.
Once complete, the hosts in VPC 2 will now access the Internet via the NAT Gateways deployed in VPC 1. To confirm this is what is happening, try running a traceroute from your host in VPC 2, it should show one of the hops being a NAT Gateway Elastic IP address.
The benefits of using this topology include the reduction in the number of NAT Gateways deployed. An example based on a single NAT gateway being deployed:
NAT Gateway Hourly charge: eu-west-1 (London) is $0.05 per hour
Therefore, ($0.05 x 24) x 365 = $438 per year.
(Costs are correct at 10th October 2019)
There are still data processing charges for any traffic, but these will only be associated to the NAT Gateways in the transit account.